|
 |
(see thread "using assumed_gamma of 1.0... a discussion", located here:
http://news.povray.org/povray.general/thread/%3Cweb.439a1b692d1f46002a1c213f0%40news.povray.org%3E/)
Anyways. My experience is this: I have a nice image_map, I follow the docs
and supply assumed_gamma of 1.0 and have Display_Gamma properly set to 2.2,
and what happens? The image_maps turn out brighter than their source. Why?
Due to the internal gamma correction of POV-Ray.
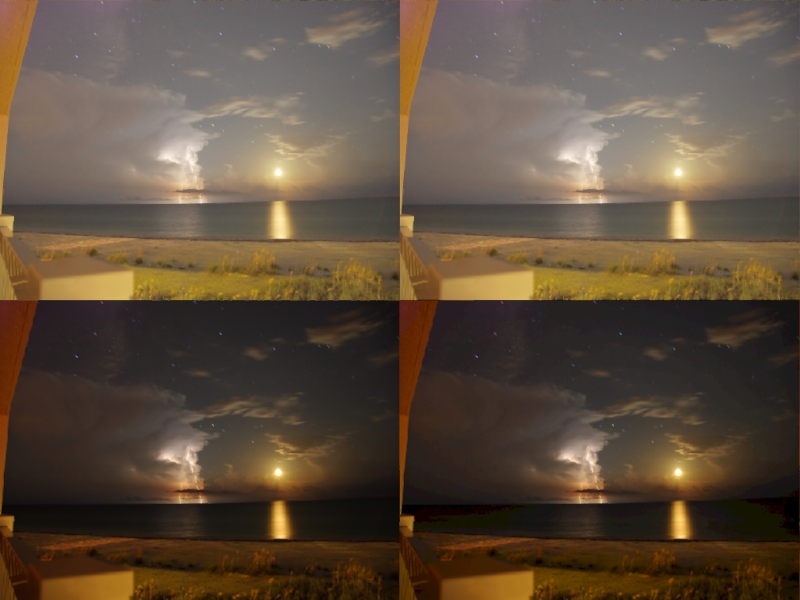
Personally, I'd like an image-map to look like it's source when its lit with
100% white light (e.g. by applying finish{ambient 1 diffuse 0}), but the
gamma-correction prevents that. The image shows this. The upper-left corner
is the pure image-map in POV-Ray. The lower-left shows the original source.
What's on the right side you ask? Well, the upper right is the image_map
"uncorrected", but passed through my gamma-correction macro using a gamma of
1.0 (to show that it doesn't "harm" the image to pass through the macro).
The lower right is the uncorrected PNG version of the image. PNG comes with
internal gamma values, and POV-Ray makes proper use of them. The problem
lies within the usual floating point (in-)accuracy. If you take a closer
look at the ocean's horizon, you'll notice color-banding and
color-clipping-like effects. That's why I'd rather not use PNGs, at least
not if they're as dark as this source.
Here's the macro:
#macro Gamma_Corrected(Image_Pigment,Gamma)
#local Image_Function =
function{
pigment{Image_Pigment}
}
#declare Gamma_Corrected_Return=
pigment{
average pigment_map{
[1 function{Image_Function(x,y,z).x} poly_wave Gamma color_map{[0 rgb
0][1 rgb 3*x]}]
[1 function{Image_Function(x,y,z).y} poly_wave Gamma color_map{[0 rgb
0][1 rgb 3*y]}]
[1 function{Image_Function(x,y,z).z} poly_wave Gamma color_map{[0 rgb
0][1 rgb 3*z]}]
}
}
//Return value
Gamma_Corrected_Return
#end
All you do is #declare your image_map as a pigment and instead of applying
it directly onto your object, you pass it through the macro, like so:
#declare Image_Map = pigment{image_map{sys "test.bmp"}}
box{-.5,.5 pigment{Gamma_Corrected(Image_Map,1.0)}
finish{ambient 1 diffuse 0}
}
I'll probably add this to my website some time soon, but wanted to get this
on the web for the ones joining the above-mentioned thread and wondering how
to do what they want to do. :-)
Regards,
Tim
--
aka "Tim Nikias v2.0"
Homepage: <http://www.nolights.de>
Post a reply to this message
Attachments:
Download 'gamma_test.jpg' (196 KB)
Preview of image 'gamma_test.jpg'
|
|